Friday 31 May 2013

 
Tonight's share is from the very Creative Eileen. Eileen never disappoints. 
Have a look at the invitation she has designed using our boutique paper range.
More of Eileen's work can be viewed at http://www.facebook.com/absolute.invitations

Photobucket

Thursday 30 May 2013

 
WOW is all I can say, look at what Leanne has just sent through... We are thrilled with what our lovely ladies can turn our chippies into.


More of Leanne's work can be viewed at
leannesscrappystuff.blogspot.com.au


Photobucket

Sunday 26 May 2013

 
Leanne has a share for us tonight showcasing more of our chippie range, and how good does she how it off!!!


More of Leanne's work can be viewed at
leannesscrappystuff.blogspot.com.au
 

Saturday 25 May 2013


I have one more share tonight, boys layouts are always scarce, but Eve can surely show us how its done. Have a look at these two boy layouts she has stunningly created for us this month

LAYOUT 1 
SNIPS AND SNAILS


Molossi products used
Molossi robots papers
Molossi steampunk cogs
Manor house flowers
Molossi double sided tape


Non Molossi products
Kraft cardstock
Kaiser bling
Inka gold


Eve tells us:
I have kept this layout rather simple by cutting some banners and arranging them down the page and edged them in black pen.I have once again used the inka gold to colour the Molossi chipboard cogs , and I have also fussy cut the rocket flourish to add to the corner .


LAYOUT 2
LOVE YOU TO THE MOON AND BACK


Molossi products used
Molossi robot/space papers
Molossi steampunk gears chipboard
Manner house flowers
Molossi double sided tape


Non Molossi products
Kaiser big bling in black
Handmade chipboard clock by Eve
Bazzill cardstock
Gesso paint
Inka gold


 Eve tells us:
 For this LO I have used a steampunk cogs template and masked the rocket paper using some inka gold in metalic blue I have also used the inka gold on the molossi chipboard cogs to give it some shimmer and shine . I hand stamped and cut a clock out of scrap chipboard .


 Be sure to follow Eve on her blog for more great designs

Photobucket

All our of our designers have been busy this week, our next share is from Narelle, look what this lovely lady has done with our MDF bare tree

Narelle tells us:
 I've sponged the 38cm bare tree with mauve paint to give a bark/ texture look to the tree, and to give some warmth to the wood and have gone around the outside of the tree with kindyglitz.


 I've added some of the gorgeous soft mauve Dusty attic flowers and leaves on both sides of the tree so that it can be free standing anywhere in the house.


Stay tuned for more Designs by Narelle. In the mean time you can visit her very creative blog
http://www.scrapperazzi.blogspot.com.au/


Photobucket

 
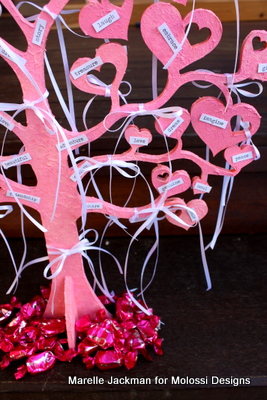
Every month we think our designers are getting more clever as the days go by...  Checkout what Marele has done with out tree of hearts.

 This is what Marelle tells us about this gorgeous creation:


I am renaming this gorgeous Molossi MDF tree The Tree of Love, or The Tree of Hearts!!!
Products used : from Molossi: The Love Tree: Derivan Matisse Transparent Gesso
Student fine art white paint by Global
Student fine art red paint by Global
Modelling Paste
Chroma Student Arcylic paint in Magenta
Tim Holtz typewriter words


These trees can be used in many ways: paint them pink or blue and use them for guests to sign for Baby’s First Birthday!
They can also be painted white for wedding table centrepieces – or as “money trees at a wedding”
They would also make an amazing 21st present painted in the fave colour of the birthday boy or girl
They would also be fabulous for a Christening, Baby Shower, Mother’s Day Present – the list is endless!


I am going to mix media the tree and show you how easy it is to make it look a little different!!
I mixed some Derivan Matisee Transparent Gesso Pastel Primer with some white Student paint and gave the tree 2 coats of this mixture : remember to paint both sides!
Next I mixed some Global Student impasto paint in red with some Global white and made a pretty pink colour.  I coated the tree twice in this colour.
Next I took my old favourite some modelling paste and mixed it with some bright pink paint.
I dabbed this mixture all over my Love Tree and left it to dry.
I love the effect : it looks like floaty fairy floss! By using the Modelling Paste it has given the tree depth and of course my favourite word texture


Next I took Tim Holtz typewriter positive words and randomly placed them over the tree on both sides.
Next I used some very fine white craft ribbon and tied bows on either side of the tree, again  randomly.
I imagine this tree to be the centrepiece of a lolly buffet at a Birthday Party for a baby Girl turning 1!
What a beautiful keepsake for years to come.


Be sure to check out Marelle's blog for more great creative ideas
 
 Photobucket

Tuesday 21 May 2013

 
Another month has passed, where is the year going? Today we have 2 projects to show from Heather


Happy 4th Birthday card

Molossi Products
Scrapbook paper: trucks & cars & roads
Scrapbook paper: Glitter Transport/Machines
Molossi double sided tape
Molossi double sided foam sqaures


Own products
Orange & blue cardstock from scrap box
Artee Supplies brads
Whimsy Farm twine
Sizzix big shot


Memories Card

Molossi Products
Molossi Chipboard gears
Molossi cream paper roses
Molossi black paper roses
Helmar Craft Glue
Molossi double sided tape


Own Products
Optix black card
Botany Naturalise Card
Stampin' Up Stamp set
Metal gear brads from scrapbox
Sizzix & chevron embossing folder
White, brown, black & gold stamp pad
Ulra thick embossing powders


Be sure to check out more of Heathers work at 
www.facebook.com/stationerybyheather


Photobucket